| CPC G01C 15/006 (2013.01) [G01C 15/06 (2013.01); G06F 30/13 (2020.01)] | 4 Claims |

|
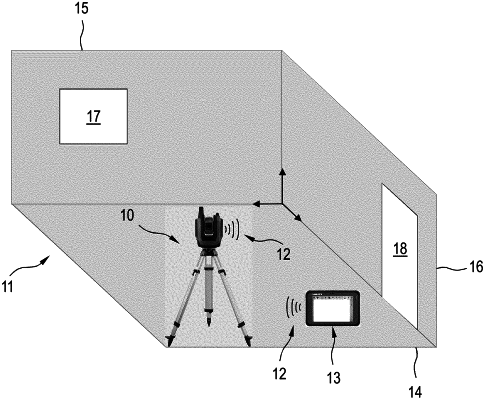
1. A method for registering a total station (10), which is deployed in a measurement environment (11) with one or more objects (14, 15, 16, 17, 18), in a reference system (24) of a computer-aided design (CAD) model (25), which images the one or more objects (14, 15, 16, 17, 18) of the measurement environment (11), by a control device (13), comprising the steps of:
selecting three surfaces (F1, F2, F3) in the CAD model (25), wherein respective normal vectors (N1, N2, N3) of the three surfaces (F1, F2, F3) span a three-dimensional space;
determining a first plane equation for a first plane (E1), which comprises a first surface (F1) of the three surfaces (F1, F2, F3), a second plane equation for a second plane (E2), which comprises a second surface (F2) of the three surfaces (F1, F2, F3), and a third plane equation for a third plane (E3), which comprises a third surface (F3) of the three surfaces (F1, F2, F3), in the reference system (24) of the CAD model (25) by the control device (13);
aligning the total station (10) in the measurement environment (11) on a point of intersection (S) of the first plane (E1), second plane (E2) and third plane (E3) in the CAD model (25), wherein the alignment of the total station (10) is defined as a start pose by the control device (13);
rotating the total station (10) about an axis of rotation (28) of the start pose and carrying out N, N∈
 , different measurements during the rotation of the total station (10), wherein, in each of the N different measurements, a horizontal angle is measured by a first angle measuring unit (21), a vertical angle is measured by a second angle measuring unit (22) and a distance is measured by a distance measuring unit (23) of the total station (10); , different measurements during the rotation of the total station (10), wherein, in each of the N different measurements, a horizontal angle is measured by a first angle measuring unit (21), a vertical angle is measured by a second angle measuring unit (22) and a distance is measured by a distance measuring unit (23) of the total station (10);storing N different measured points (M1-M19) with measured coordinates, wherein the measured coordinates comprise the horizontal angle, the vertical angle and the distance;
assigning K of the N, K≤N, different measured points to the first plane (E1), to the second plane (E2) or to the third plane (E3), wherein measured points assigned to the first plane (E1) are defined as first measured points (A1), measured points assigned to the second plane (E2) are defined as second measured points (A2) and measured points assigned to the third plane (E3) are defined as third measured points (A3) by the control device (13);
determining a first function equation for the first measured points (A1), a second function equation for the second measured points (A2) and a third function equation for the third measured points (A3) in the reference system (26) of the total station (10) by the control device (13);
determining a mapping between the first, the second and the third plane equations in the reference system (24) of the CAD model (25) and the first, the second and the third function equations in the reference system (26) of the total station (10) by the control device (13); and
storing the mapping as a transformation function between the reference system (26) of the total station (10) and the reference system (24) of the CAD model (25).
|