| CPC G01M 13/021 (2013.01) | 1 Claim |

|
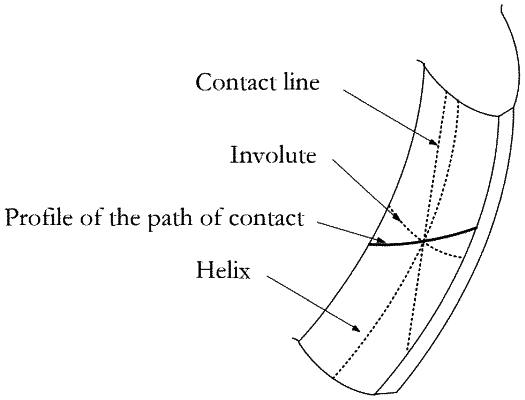
1. A method for checking or testing the profile of the path of contact of involute helical cylindrical gears, wherein a coordinate system δ (O−x, y, z) is established, where δ is the name of the coordinate system, O is a symmetrical center of a tested gear, and x, y, and z are three coordinate axes in the coordinate system δ respectively, the z-axis coincides with a central axis of the tested gear, and rb is a base cylindrical radius of the tested gear; plane S is a tangent plane of a base cylinder of the tested gear, which is tangent to a straight-line EF and intersects with an involute helical tooth surface of the tested gear at a straight-line MN; the straight-line MN is a generatrix of the involute helical tooth surface of the tested gear; in a process of involute gear transmission, a straight-line ad′0 is an action line of the tested gear, which is used to transmit displacement and force; the action line is located in the tangent plane and perpendicular to the generatrix of the involute helical tooth surface; a trajectory of intersection points between the action line and the involute helical tooth surface of the tested gear is a profile of the path of contact ad0;
the method comprising: measuring the profile of the path of contact on the involute helical tooth surface of the tested gear via a four-axis control scheme: when the tested gear rotates at a constant speed, a probe of a measuring instrument not only synchronously moves along a tangential direction within the tangent plane of the base cylinder of the tested gear, but also synchronously superimposes radial and axial movements; the probe moves along the action line within the tangent plane of the base cylinder of the tested gear, and collected tooth surface information data is the profile of the path of contact on the involute helical tooth surface of the tested gear;
when the tested gear rotates at a constant speed, the probe of the measuring instrument starts from point a on the involute helical tooth surface, and not only synchronously moves along X-axis direction in the tangent plane of the base cylinder of the tested gear, but also synchronously overlaps movements in Y-axis direction and Z-axis direction; the probe of the measuring instrument moves to point d′0 and ends along the action line within the tangent plane of the base cylinder of the tested gear; tooth surface information data collected by the probe is the profile of the path of contact ad0 on the involute helical tooth surface of the tested gear; a computer control device accurately controls synchronous motion of a X-axis motor, a Z-axis motor, and a rotating axis motor simultaneously in order to achieve entire measurement process;
the four-axis control scheme for measuring the profile of the path of contact on the involute helical gear tooth surface has the following extended applications:
(1) Three-axis control method for measuring the profile of the path of contact
if y=rb, that is, the tangent plane of the base cylinder of the tested gear is perpendicular to the y-axis in the coordinate system δ; in meshing transmission of the tested gear, the action line is a straight line in the tangent plane perpendicular to the y-axis, and the trajectory of the intersection point with the involute helical tooth surface of the tested gear is the profile of the path of contact ad0; the four-axis control scheme can be simplified as three-axis control method: when the tested gear rotates at a constant speed, the probe of the measuring instrument not only synchronously moves along the tangential direction (the X-axis direction) within the tangent plane of the base cylinder of the tested gear, but also synchronously superimposes the axial movement (the Z-axis direction);
(2) Normal generation method for measuring the involute profile
if the z-axis is fixed at a position in the four-axis control method, where z=z0, the four-axis control scheme can be simplified as a normal generation method for measuring the involute profile; when the tested gear rotates at a constant speed, the probe of the measuring instrument synchronously moves along the tangential direction the X-axis direction) and radial direction (the Y-axis direction) within the tangent plane of the base cylinder of the tested gear; at this point, the probe of the measuring instrument will move along a straight-line ad′1 in the tangent plane of the base cylinder of the tested gear to measure an involute ad1 on the involute helical tooth surface.
|