| CPC G06T 11/60 (2013.01) [G06F 3/04842 (2013.01); G06F 3/04845 (2013.01); G06F 3/0485 (2013.01); G06T 7/0004 (2013.01); G06T 7/001 (2013.01); G06T 7/11 (2017.01); G06T 7/13 (2017.01); G06T 7/60 (2013.01); G06V 10/44 (2022.01); G06F 2203/04806 (2013.01); G06T 2200/24 (2013.01); G06T 2207/10004 (2013.01); G06T 2207/10016 (2013.01); G06T 2207/20092 (2013.01); G06T 2207/20164 (2013.01); G06T 2207/20221 (2013.01); G06T 2207/30108 (2013.01); G06V 2201/06 (2022.01)] | 17 Claims |

|
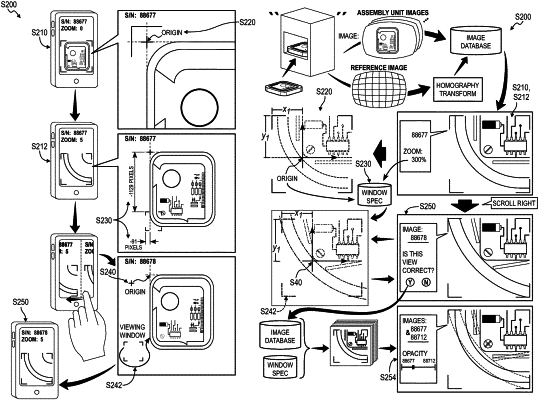
1. A method for automatically measuring a common feature across multiple assembly units comprising:
accessing a first image recorded at an optical inspection station and representing a first assembly unit;
receiving selection of a feature of interest in the first assembly unit;
projecting a dimension space onto the first image, the dimension space configured to compensate for optical distortion in the first image recorded at the optical inspection station;
extracting a first absolute length of the feature of interest in the first assembly unit from the first image according to the dimension space;
defining a feature window encompassing the particular feature of interest, offset from the feature of interest, and located relative to a first global origin of the first image;
for each image in a set of images:
locating the feature window in the image;
identifying a feature in an assembly unit represented within the feature window in the image, the feature in the assembly unit analogous to the feature of interest in the first assembly unit; and
extracting an absolute length of the feature in the assembly unit from the image; and
aggregating the first absolute length and a set of absolute lengths extracted from the set of images into a digital container.
|
|
15. A method for automatically measuring a feature across multiple assembly units comprising:
accessing a first image recorded at an optical inspection station and representing a first assembly unit;
receiving selection of a pair of features of interest in the first assembly unit represented in the first image;
projecting a dimension space onto the first image, the dimension space configured to compensate for optical distortion in the first image recorded at the optical inspection station;
extracting a first absolute length between the pair of features of interest in the first assembly unit from the first image according to the dimension space;
defining a feature window encompassing the pair of features of interest, offset from the pair of features of interest, and located relative to a first global origin of the first image;
for each image in a set of images:
locating the feature window in the image;
identifying a pair of features in an assembly unit represented within the feature window in the image, the pair of features analogous to the pair of features of interest in the first assembly unit;
extracting an absolute length between the pair of features in the assembly unit from the image; and
aggregating the first absolute length and a set of absolute lengths extracted from the set of images into a digital container.
|
|
17. A method for automatically measuring a feature across multiple assembly units comprising:
accessing a first image recorded at an optical inspection station and representing a first assembly unit;
receiving selection of a set of features of interest in the first assembly unit represented in the first image;
projecting a dimension space onto the first image, the dimension space configured to compensate for optical distortion in the first image recorded at the optical inspection station;
extracting a first absolute radius of the set of features of interest in the first assembly unit from the first image according to the dimension space;
defining a feature window encompassing the set of features of interest, offset from the set of features of interest, and located relative to a first global origin of the first image;
for each image in a set of images:
locating the feature window in the image;
identifying a set of features in an assembly unit represented within the feature window in the image, the set of features analogous to the set of features of interest in the first assembly unit;
extracting an absolute radius of the set of features in the assembly unit from the image; and
aggregating the first absolute radius and a set of absolute radii extracted from the set of images into a digital container.
|