| CPC G05B 19/401 (2013.01) [G01B 5/008 (2013.01); G05B 19/4069 (2013.01); G05B 19/4097 (2013.01); G06F 3/0481 (2013.01); G06T 15/20 (2013.01); G06T 15/40 (2013.01); G05B 2219/37443 (2013.01); G06F 2203/04804 (2013.01); G06V 10/26 (2022.01)] | 21 Claims |

|
1. A system for programming workpiece feature inspection operations for a coordinate measuring machine (CMM), the CMM including at least one sensor used for determining workpiece feature measurement data, and a stage for holding a workpiece wherein at least one of the sensor or the stage are movable relative to one another, the system comprising:
a computer-aided design (CAD) file processing portion which is part of a programming portion and which inputs a workpiece CAD file corresponding to a workpiece and analyzes the file to automatically determine inspectable workpiece features on the workpiece corresponding to a plurality of geometric feature types; and
a user interface comprising:
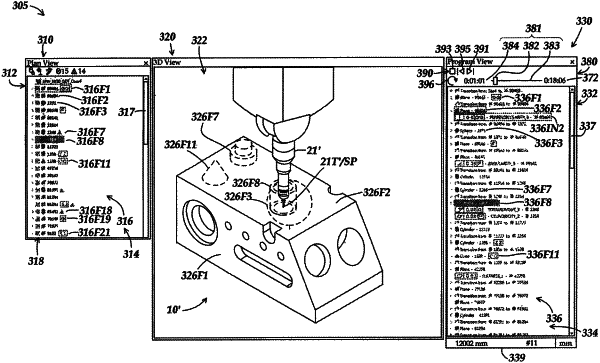
a workpiece inspection program simulation portion which is included in a three dimensional (3D) view window and which comprises a 3D view including at least one of workpiece features on the workpiece or inspection operation representations corresponding to inspection operations to be performed on workpiece features according to a current workpiece feature inspection plan; and
an editing user interface portion which is included in at least one of a plan view window or a program view window and which comprises an editable plan representation of the current workpiece feature inspection plan for the workpiece corresponding to the CAD file, the editable plan representation comprising at least one of workpiece features or inspection operation representations;
wherein:
the system is configured to automatically perform a set of transparency operations in response to a feature-directed operation included in a first set of feature-directed operations;
the first set of feature-directed operations comprises:
a selection operation for a workpiece feature or an inspection operation representation in the editable plan representation;
the set of transparency operations that is automatically performed in response to the feature directed operation comprises:
automatically identifying as a current target feature a workpiece feature in the 3D view that corresponds to a workpiece feature or inspection operation representation that is selected in the editable plan representation by the selection operation, wherein the selection operation is a current feature-directed operation;
automatically determining that a first occluding workpiece feature is occluding at least a portion of the current target feature in the 3D view;
in response to the determination that the first occluding workpiece feature is occluding at least part of the target feature in the 3D view, automatically rendering as at least partially transparent in the 3D view the first occluding workpiece feature; and
when the current feature-directed operation is terminated, automatically terminating the transparency operations associated with the current target feature in the 3D view; and
the current workpiece feature inspection plan comprises at least one of measuring or touching a sampling point on the current target feature, using a CMM measuring probe, and for which the sampling point on the current target feature is made to be visible in the 3D view by the automatic rendering of the first occluding workpiece feature as at least partially transparent.
|